STEPS :
# NEXUS3 INSTALLATION by shell commands

sudo apt install openjdk-8-jdk -y

cd /opt
wget https://download.sonatype.com/nexus/3/nexus-3.59.0-01-unix.tar.gz
tar -xvf nexus-3.59.0-01-unix.tar.gz

# Create user nexus

adduser nexus

chown -R nexus:nexus nexus-3.59.0-01/
chown -R nexus:nexus sonatype-work/

vi nexus-3.59.0-01/bin/nexus.rc
in ""  put nexus  --->"nexus"

/opt/nexus-3.59.0-01/bin/nexus start
Installation using Docker (Easy Way) :
To install Nexus 3 using Docker and retrieve the initial admin password, you can use the following shell commands:
1. Install Nexus 3 Using Docker:
docker run -d -p 8081:8081 --name nexus sonatype/nexus3
This command pulls the Nexus 3 Docker image from the official Sonatype repository and runs it as a detached container (-d). It exposes the Nexus web interface on host port 8081 (-p 8081:8081) and names the container "nexus."
2. Retrieve the Initial Admin Password:
Wait for Nexus to start, and then retrieve the initial admin password. You can do this by checking the logs or using the following command:
docker ps
# note down container_ID
docker exec -it container_ID /bin/bash
# cat sonatype-work/nexus3/admin.password
This command uses docker exec to execute a command inside the running "nexus" container. The command cat /nexus-data/admin.password prints the initial admin password to the terminal.
3. Access Nexus 3 Web Interface:
Open a web browser and go to http://localhost:8081. Log in with the username "admin" and the password retrieved in the previous step.
Note: Make sure to wait for Nexus 3 to fully initialize before attempting to retrieve the admin password.
Cleanup (Optional):
If you want to stop and remove the Nexus 3 Docker container after testing, you can use the following commands:
docker stop nexus
docker rm nexus
These commands stop and remove the "nexus" container.
Remember to adjust the Docker commands based on your specific requirements and environment. Additionally, ensure that Docker is installed and configured on your system before running these commands.
ADD in POM :
<project>
    <!-- ... other project information ... -->

    <distributionManagement>
        <repository>
            <id>maven-releases</id>
            <url>NEXUS-URL/repository/maven-releases/</url>
        </repository>
        <snapshotRepository>
            <id>maven-snapshots</id>
            <url>NEXUS-URL/repository/maven-snapshots/</url>
        </snapshotRepository>
    </distributionManagement>

    <!-- ... other project configuration ... -->
</project>
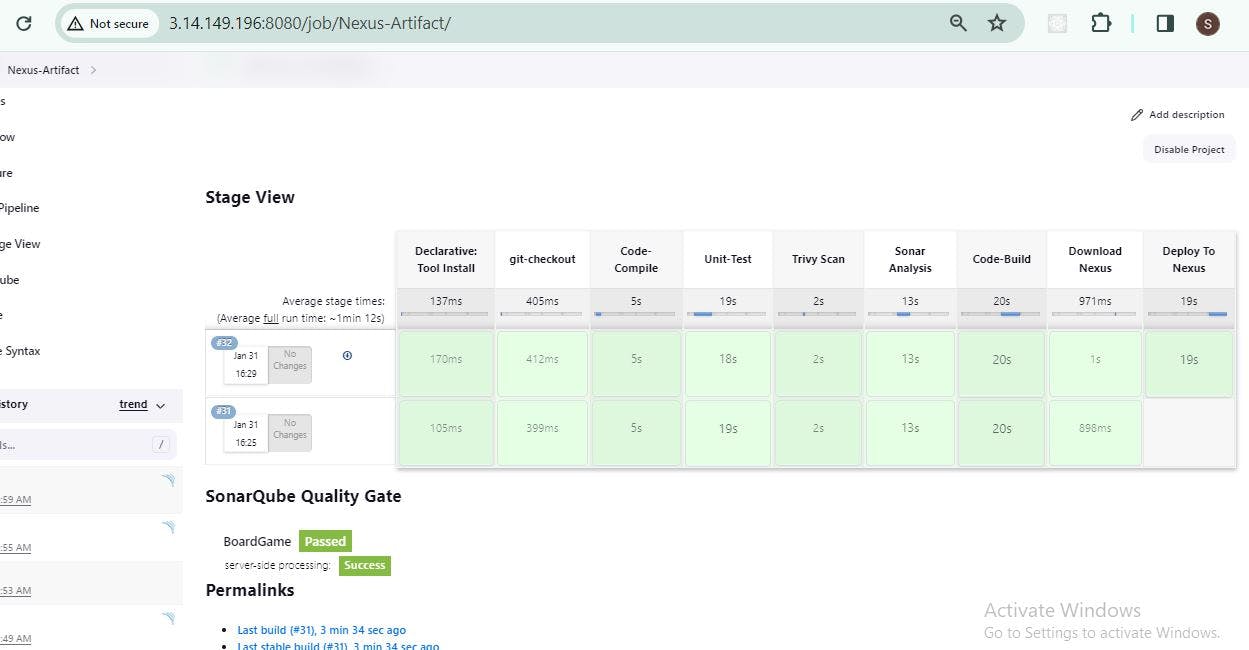
PIPELINE :
pipeline {
    agent any
    tools{
        jdk 'jdk17'
        maven 'maven3'
    }
    environment{
        SCANNER_HOME= tool 'sonar-scanner'
    }

    stages {
        stage('git-checkout') {
            steps {
                git 'https://github.com/patilshrishail/BoardgameListingWebApp.git'
            }
        }

        stage('Code-Compile') {
            steps {
               sh "mvn clean compile"
            }
        }

        stage('Unit-Test') {
            steps {
               sh "mvn clean test"
            }
        }

        stage('Trivy Scan') {
            steps {
               sh "trivy fs ."
            }
        }

        stage('OWASP Dependency Check') {
            steps {
               dependencyCheck additionalArguments: ' --scan ./ ', odcInstallation: 'DC'
                    dependencyCheckPublisher pattern: '**/dependency-check-report.xml'
            }
        }

        stage('Sonar Analysis') {
            steps {
               withSonarQubeEnv('sonar'){
                   sh ''' $SCANNER_HOME/bin/sonar-scanner -Dsonar.projectName=BoardGame \
                   -Dsonar.java.binaries=. \
                   -Dsonar.projectKey=BoardGame '''
               }
            }
        }

        stage('Download JAR with Credentials') {
            steps {
                script {
                    withCredentials([usernamePassword(credentialsId: 'your-credentials-id', usernameVariable: 'user', passwordVariable: 'pass')]) {
                        def jarUrl = 'https://example.com/path/to/your.jar'

                        sh "curl -u $user:$pass -O $jarUrl"
                    }
                }
            }
        }

        stage('Build & Deploy To Nexus') {
            steps {
               withMaven(globalMavenSettingsConfig: 'e7838703-298a-44a7-b080-a9ac14fa0a5e') {
                    sh "mvn deploy"
               }
            }
        }
    }
}


